Wednesday, October 17, 2012

The Things We KNEW about (kind of.)

There is a painful section of this story that I am going to skip over for this post and get to the pretty (the part I am skipping is what I considered soul killing....and there is more of that to come, but it will have to wait.  And when I say wait, it may have to wait until I die before the whole story can truly come out! hahaha)

But here are a few of my favorite things.  Please review my last post so you can remember it in it's glory.....

No my favorite thing is NOT the old pad, but I thought you might "like" to see it.  EW. I believe it was actually rubber based.  I had to take the section in the dining room out myself (the tile was actually done before the carpet) and it was HEAVY.  It was also taped together with duct tape so it was sticky.  It was the dining room's worth of this carpet and pad that gave me a true appreciation for why N's new car is a Honda FIT.  That tiny little car can hold a LOT of crap!  It also helped me make a goal to never EVER go to the Lawton dump.  Princess Leia...upon being told to go in the trash chute. Nasty.

So here is the new carpet pad and I will share an important life lesson N and I have learned. Always always always upgrade the carpet pad. For many years we had area rugs (Maryland, Hawaii AND Korea) and for many years our friends have always commented on how great our carpets are. The carpet itself was not expensive or fancy....it was a mid-grade remnant we had bound. The secret was two layers of carpet pad under it. I didn't know how two layers would hold up installed so I only went with one but I got the best they had....and I have to say, it has not disappointed.
What you see here is what I call the "contrast shot."  Look back to the pic of the raspberry carpet in the last entry....the one where you can see the HALLWAY through the door.  As I chose my carpet color I was haunted by that hideous view.  Since the raspberry was nearly new and in quite good condition....and since this house is likely to be a rental in a few years I decided (and occasionally regret) to only change the avocado....but I had to pick something pretty (that felt nice) and neutral but that would not be AWFUL with the raspberry.  SO here it is: Riverstone.  I wanted gray tones rather than brown, but with the family room still being brown I needed the tile to be both. Keep scrolling, and I think you will agree that I won that round. heh.
This is not the most expensive carpet we could have bought, nor is the tile special ordered (good thing since I bought/returned tile on 4 separate occasions...original purchase, HD estimated wrong, bathrooms and then BATHROOM.  Long story.) But I must say, it still makes me happy to walk on the carpet I picked with my bare feet, and doing Child's Pose with my face in the rug is NOT a problem at all. hehehehe

The folks who laid the tile recommend that you clean it with Listerine (original flavor...NOT colored.)  I thought that was interesting but have tried it in one of the bathrooms and it is the real deal.  Try it if you have tile.

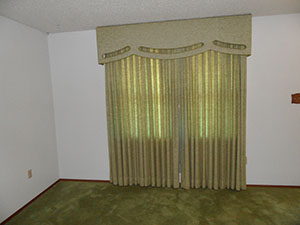
Now, by rights, I should now post pics of how it looks with our stuff in it.  Of course THAT would require a good bit of house cleaning so that isn't going to happen today because I am either going to have to do a serious tidy or I am going to have to convince myself I can show it as it is....both daunting prospects.  But enjoy my pretty carpet and tile for now.  I still have the ridiculous window treatment but I have a plan! k.

Tuesday, October 16, 2012

I Know You Have Been Waiting

As in all parts of my life, the pictures suffer, the reporting suffers.  It is not that you should assume nothing has been happening.  Quite the opposite.  When you see posts it means I am desperately, uncharacteristically, without things to do!  (I am currently without sewing machine....in the shop, and the pears I wish to can are not quite ripe, so you see....)

In Mid-May of this year (2012) our little family acquired a house.  As our first house was very full of character and turned out to be a fabulous purchase we really had our job cut out for us.  Unlike our first little house though, this one had to be acquired by me.....alone with children in tow.  I am forever grateful for my parents who were here to rescue the jet-lagged, weary wanderers that we were and assist in the process in uncountable ways.
After much deliberation, and a little surprise, but not all that much, I decided on "The Avocado House."  A double garage, 4 bedrooms, an extra family room and fruit trees covered in tiny pears and peaches, it sounds great, doesn't it.  But there is no Avocado tree...THIS is the source of the name:

Yes, that is the living room.  The avocado carpeting was only overshadowed by the impressive Blast from the Past Window Treatment.  To be fair, the carpet must have been of incredibly high quality when purchased in the 70s (the house was built in 1973) to have survived this long.  Also, the window treatment, while massive and incredibly ugly was crafted with remarkable care.  The cut outs are corded with piping?!?!  Below is the Detail of the tile at the front door.
When the carpet guys came to replace the carpet they confirmed that, yes, it is probably original.  The area in the hallway and dining room had not fared as well as the living room and were pretty nasty.  Also, the pad underneath was something to see (and the cause of some of the trouble in the hallway as it had broken down visibly leaving large divots in the surface of the carpet.  Here are the kiddos in "House Hunting Mode."  They spent a LOT of time with their DSs on the floor...in houses....at the Home Depot....ooof, they do NOT like the Home Depot! hahah.  They are seated in the dining room under my husband's favorite ceiling fan! (He hasn't torn it out yet but it doesn't even have bulbs in it anymore and he refuses to use it.  It really isn't THAT bad....it does have painted brown flowers on it though...and ruffly edges.)
Other than the obvious carpeting challenges of color, you will note that the "dining room" is carpeted.  I remember absolutely hating the job of picking the little kid's rice leavings out of the carpet when I was a kid....so no carpeted dining area for me! No Sir!  The kitchen flooring situation made it easy to decide to do the whole area in modern tile....well, it made the design decision easy.  The practice of it?  Well that will come in another episode....I am not sure I can face it yet.

The golden metal strip covers a 1/4 inch lip separating the vinyl and the prison gray tile.....
Other than the 90's green of the vertical blinds the mostly neutral brown of the carpet in the family room could stay.  N objects more strenuously to the paneling (it is through much of the house) but I don't really see a problem with it.  The finished basement that doubled as kid bedroom central when I was a little girl was paneled so it speaks to me of home...or at least half home.  Featured prominently in the above picture is one of the....well, features of our new place.  Look carefully at the window there.  Yep, it looks right in to Bedroom #4 also known as My Office.  As the smallest bedroom (about 9X9) I don't mind, especially since it enables me to have my computer in the family room with the rest of the family but still have audiobook speakers in my office.  For those of you who don't know, in order to be counted as a bedroom, a room must have two possible exits for safety.  I do think it is funny that we have vertical blinds on the Family Room side of the window....I guess so no one HAS to look in my office if they don't want to.

The last few bits of character I feel I should point out are the surprising Raspberry carpeting (with matching miniblinds!) in the bedrooms and the interesting (and ultimately engaging) texture on the walls throughout the house. (yeah, those are gigantic Daisies.....everywhere.  I love them...no really, I actually do.)

Now the bathrooms are a completely "other" sort of category, but here are two of them in their glory. Note 70's avocado industrial design tile and jungle green vanity top....and be sure you don't miss my turquoise dream. (It looks more light blue, but it was turquoise!) We had a plan for that bathroom that involved a cool underwater quilted wallhanging and a fishy toilet seat. We were disappointed in our hopes.....To Be Continued......

Friday, January 13, 2012

Practice Practice Practice

I have been enjoying reading all the entries in the Quilt Along over at http://freemotionquilting.blogspot.com/
and suddenly started feeling just the tiniest bit guilty...because I was only READING.  As part of my effort to get organized, I emptied one of my boxes (to store Miss S's sewing gear) and came upon my heap of abandoned projects.  I realized that if I was ever going to get any better (at quilting or being organized and productive!) now was the time.  So I slapped a border on this free-form piece and decided to PRACTICE.

So here we are.  The practice from this week was stippling and I am apparently incapable of doing anything on a large scale (which isn't all that surprising considering boxpleat's roots as a doll "concern.")  This is still a pretty small piece and the stippling is a good bit smaller than the recommended 1/2 inch (closer to 1/4 inch) scale but it is continuous and gave me a good opportunity to consider both Leah Day's preferred method of lines (which I didn't really use but thought about a great deal as I charted my way over the space) and my technique and speed.  I found that I tend to quilt in a fan shape with my lines actually more like arcs until I get within range on the corners of the project.
I am pleased to note that I never boxed myself into a corner and that it is indeed continuous but it did remind me of how much I need to work on my ergonomics.  I also realized that I need to work on my speed since I like the feel of it better at a higher rate but get chicken...and then get less fluid.  This piece also had some very high seam intersections that gave me a bit of trouble.  I wouldn't have those problems on a regular quilt top, but it was also something to think about as it pulled me up short several times.  (The problem areas were readily solved by adjusting my presser foot pressure.)

This piece was constructed in the "string" method, with strips added to a backing.  Unlike a traditional string piece I then cut up and remastered my strips until I had enough breaks in the line.  I would rotary cut across a section and recombine it at a different angle. 
This is part of the reason why I ended up with big seam joins in a few areas, but it does lend itself to a nice random modern look with hard edges.  The palette is also pretty "manly" so I told N it was for his office.  You see, the secret to successful practice is to make it something you don't have to stare down every day. hahah.  I am not sure that stippling is the BEST quilt line for such an angular looking piece but it was just about the right amount of practice for one day.


On a final note, I would like to observe two things: I meant to quilt it in a variegated gold and off white thread....which I completely forgot to load on the machine AND well, both N and I like the back best. hah. k. (Sorry for the almost year long gap in any word from me, but dang it is hard to blog.  I also didn't figure out my new camera...it was speaking Korean! soon enough to get the incorrect date stamp off my pics.  sigh!)

Tuesday, March 8, 2011

k's 3 Panel Vintage Skirt

After reading all the responses on Gertie's Blog for Better Sewing (Thanks Carolyn!) to the question of whether or not one's wardrobe was more than 30% dresses, I got to thinking....and thinking hard about how attached I really am to my Mom Uniform of Jeans and a T shirt day in day out.  Many of the women responding indicated that they never wore pants, largely because skirts were the winning combination of comfortable and more stylish (with the added benefits that they are MUCH easier to fit and similarly MUCH easier to make.)

So why do I, owner of 30 skirts not wear them?  I think the only answer that is strictly true is habit.  So maybe I ought to change that.  Last summer I started trying to wear more skirts and I was fairly successful after the addition of my pale blue tiered skirt (First item I actually put my tag in that I made for ME!) and a few other A-line types.


While Winter is getting out her last gasps, I am ready to have some Spring, so the sewing for said season has begun.  (As an aside, I really haven't sewn a whole lot for myself since the beginning of the whole boxpleat adventure...when you work at what you love, what you love becomes...at least on some level, work.  It is a pitfall that is difficult to avoid.)  On Saturday, the girl and I went to the glorious Dongdaemun which is perhaps my favorite experience of Korea.  I instructed her that we were buying fabric for Skirts and that is exactly what we did.  Her skirt is likely to appear here later, but not yet.  This is what I began when we got home.

I loved the idea of this fabric in a BIG skirt.  I should have gotten more, but that made me creative and it was totally worth it....I'll explain later.

I have often observed that what I like best about vintage clothing is the attention to detail...the little things that take longer but add a lot of punch to a design.  I decided this fabric needed piping, so there it is.  I did this piping with half a strip from a jelly roll, but I will tell you now, that wasn't quite enough for comfort.  The edge left over wasn't as wide as the seam allowance I wanted to use.  So I would have been happier with more, but I didn't have it so, oh well.  If you are going to try it though, you will need a decent sized piece of contrast!  (Especially since the ideal piping is cut on the bias....yeah I really am that chintzy.)  This design has piping on both top and bottom of the waistband and at the pocket openings.  If you don't do piping, this skirt could be made in about an hour I suspect.  (Well maybe not if you want to hand stitch the hem, but you can do THAT in front of the TV so maybe you don't need to count that anyway!)

The basic design is this:
Cutting
1. Cut 3 pieces of fabric, selvedge to selvedge the length you want the skirt plus the hem depth you want plus seam allowance. L+H+5/8. I made this version out of 2 yards of the main fabric, but as you can see, my hem had to be faced with the contrast fabric so it wouldn't be too short.  I recommend giving yourself a bit more "slack;"  Do as I say, not as I do. ;)  Also remember a good hem depth will give a BIG skirt some weight at the bottom so it hangs better.
2. Cut a length for the waistband (same direction as the skirt pieces.)  This should be the desired width of the waistband times 2 plus seam allowances (2 or 4 if you are doing piping.)  2W+2(5/8) or 2W+4(5/8) for piping, split it again.  (No piping stays in one piece.)
3. Trim the waistband piece to your waist measurement including seam allowances (on both ends!)ease and desired overlap.  There are calculations for necessary ease etc which I don't know heheh, but consider your comfort, remembering that you were probably sucking in a bit when you measured, that you might be eating a big dinner when you wear it, AND that you don't want it to fall off or gap.  The desired overlap will depend on what kind of closure you want to do at the waist....big fancy buttons require more space than trim little skirt hooks. W+2(5/8)+E?+O

Sewing
1. Serge or otherwise finish one edge (cut off the selvedge) on 2 panels.  Make sure that you examine your fabric design.  If it is directional, you need to make sure that the edges you choose will meet up....so when you sew these two pieces together, some of the cute little owls you picked aren't roosting upside down!  If you want you can finish ALL the edges.  You will be tempted to just use the selvedge.  I won't judge you if you do (I have done it) but you should be aware that it may shrink differently than the rest of your fabric so might look puckered later.

2. Sew these two panels together, using your longest stitch (5) for the length of the zipper you are using.  Back stitch at the bottom of the zipper length, change to a regular stitch length (2.5-3) and sew to the end.  Press the seam open.
3. Put in your zipper.  (If you don't know how to do this, there are lots of great tutorials on the ubiquitous YouTube.  A few thoughts though: Line up the zipper coil right along the center of the pressed open seam.  I always pin on both sides towards the coil.  If you have been frustrated with zippers in the past, consider basting.  YouTube taught me, after years of zippers, that if you get a zipper longer than you need you can leave the excess above the top of your project so you don't have to deal with the tab under your zipper foot.  Trust me, THAT was a revelation.  It cut down distinctly on the swearing and improved the look dramatically.)  Since this is located in hte back, a centered application is probably called for, but you can do either style.
4. Sew the 3rd panel to the free edges. Finish the edges here if you didn't do this already.
(4.5)Pockets: If you put pockets here they are going to fall to the sides of the front. A basic pocket bag is just a folded rectangle of fabric attached to the seams for part of its length, and to itself for the rest.  You need to keep it out of the way as you finish the rest of the skirt seam.
5. Gathering.Use your largest stitch and sew along the top seam allowance in a continuous line.  Add another line 1/4 inch  above that.  You pull the bobbin/back thread for gathering.  Go slowly and a little carefully so you don't break the threads. ;)  (I usually mark centers, quarters etc on both skirt and waistband so my gathers are easier to distribute evenly.)  The gathered skirt panels should be pinned to one layer of the waistband.  Remember that your overlap (and seam allowances) shouldn't have any skirt attached to them. ;)
(5.5)Piping waistband: Before you pin the gathered panels on, sandwich the piping between your two waistband pieces, raw edges all lining up.  If your waistband  is wide, you may want to include some good interfacing, if it is very narrow you may not need it.  Decide which is the "outside" of your waistband and baste a second row of piping to the bottom, keeping the raw edges together.  When you pin your gathered panels to the waistband it should line up with the raw edges of the piping.  You can use the basting line to guide your seam.

6. Waistband. Press the seam allowance in on the loose (long) edge of the waistband.  Fold the waistband, right sides together with the folded edge of the seam allowance lining up with where the gathered edge is attached.  Sew the short ends on your seam allowance, back stitching at the ends.  Turn the waistband right side out, making sure to get your corners poked out.  You can attach the back of the waistband by hand, catch stitching the folded edge to the seam line, or you can pin or baste carefully and top stitch from the front.  Put the closure of your choice.  (I have to admit that not a single skirt I made as a teenager ever sported any closure but a safety pin. hehe.
7. Hem.  As I mentioned earlier, a good hem can help a skirt hang better.  I like to hand hem, but you could also do this on the machine.  You should be sure the raw edge of the hem is finished or rolled under before you hem.

Whew, it is MUCH harder for me to explain how to do this than it is to just do it.  Sigh!  I can see why the YouTube video tutorial is becoming such a popular format!  I welcome questions and suggestions for clarity. ;)  And, yes, I will try to put some pics in some time, but if you read often you know pictures are always my down fall. hehehehe k.

Thursday, February 3, 2011

New Quilt Top + Personal Achievement

At the end of the day I am occasionally bewildered where it went. There are always a million things to do and never enough tie or energy to even want to do a good many of them. We talked about log cabin blocks at Cursed Quilt this month and I figured that now was as good a time as any to "spend" some of my stash on something. So here it is:

Some of my friends may recognize this as fabric I acquired mostly on our warehouse trip to Happy Quilt. As you can see, it is not a traditional log cabin block. I like the squares quite a lot. The centers were cut 4 1/2 inches and the strips are 2 1/2 and 1 1/2 inches respectively. I cut this before the latest round of Accuquilt arrived so I only used it on the big strips.

The wide strips are all my prints from the palette. I decided to give it a bit of...what...contrast? with the black and cream. I didn't have a solid olive that would work so this lovely subtle print filled in for the last narrow color band. You can see that each block has ONE narrow band except for the very last block I put together which has all three, largely because I didn't want to cut more strips and I had lots of the narrow ones left. Each layout is different with the narrow strip falling in a different position. I am not sure that I am going to be able to give this one away. It suits me, although what I will do with a lap quilt I don't know. (Since the last lap sized quilt top is still unquilted form two summers ago! hehehe)

The last thing to report is my great achievement. I ate a thing from my balcony garden. Check them out....They are pictured next to an actually appropriately sized squash for comparison. These were grown from seeds that came out of an actual squash.  I am not sure if their size is based on engineering for big yield...which conditions my garden did not meet...or because of the constrained growing conditions of my pot/winter balcony...or if perhaps the mold I kept getting on the leaves was just too much for them.  It could also be that they simply didn't ever get pollinated properly and so couldn't manage.  There weren't actually any seeds in them I don't think.  At any rate, they were very cute.

The final verdict was that their texture was a bit smoother than normal, a bit starchier rather than stringy as I usually expect squash to be.  But in any case, we will hum that Primary song that no one actually seems to know "The Prophet Says to Plant a Garden" and feel satisfied.  Be productive somehow today, even if the only thing you produce is mess. k.

Friday, January 28, 2011

I finally did it!

After what has felt like millenia, I have finally posted some new "work" for boxpleat.  This is a salesroom for the DeeAnna Denton sized body, oh she of the particularly demanding figure.  I am happy with the fit on these new patterns and have decided that the current order of "work fun" is: drafting/designing, fabric shopping, sewing (construction), webwork, finishing, photography.  In that order.  I have actually contemplated sub-contracting the photography as I enjoy it so very little in the grand scheme of things.  I guess what I need to do is take a photography class to get motivated about it. sigh!


Have a look at the salesroom and tell me what you think. (Click on the title "I finally did it! above) I need some feedback so I know what to work on next....well, it isn't as if there isn't a MOUNTAIN of other things to work on, but it is nice to have some direction, you know? k.

Sunday, January 2, 2011

Too Long and New Plans

I spent the Week between Christmas and New Year's cleaning my office.  I know you aren't going to believe it but you can actually SEE the floor.  All of it.

Of course that means I can't ever sew again right?!?!  sigh!  My husband keeps thinking that another cutting space would solve my floor issues, but I keep assuring him that just isn't going to help.  I *like* working on the floor.  I like sorting and cutting, I like storing projects I am thinking about out in plain sight so, well, so I keep thinking about them.

So the clean office has made me think about what it is that I really want to happen this year.  After the surprising return of my work "mojo" (that is such a silly phrase, isn't it?!?) I am feeling newly inspired to WORK.  My dear friend Pam Seeman of Paintbox Designs says she is willing to take stuff to the Tonner Convention this Spring so I have to really get ready for that!  (Of the minimalist income Boxpleat made last year 94% was from the last convention when I sent stuff to Pam! hehehe  I actually did the math.)  In pursuit of that plan, I hope to actually make some of the things that were cut years ago and that have been sitting here in my office....things from Hawaii for example.  I actually threw out a lot of things that I finally decided I really wasn't ever going to make.

I also have big plans to work on quilting donations and more pillowcases.  The box of pillowcases I sent found a home at a battered women's shelter in Loveland, CO.  Thanks to the ladies who helped with that.  I hope that the ladies and kids who get them will be comforted and encouraged.  sigh!

I also have been reviewing some of the "reporting" style challenges that are circulating around the internet.  http://patchworktimes.com has a UFO (Un-Finished Object) challenge that sounds fun.  They also do a "stashbusting" report each week to encourage the participants to actually track their fabric and use more than they buy in any given week.  Tricky!  I actually was considering that I should try to decrease my stash of great fabrics by actually USING them before we leave Korea so I can justify stashing a whole bunch more when I am ready to leave. hehehe


Other plans include earning some money towards the replacement sewing machine that I am going to need sooner rather than later (because I can't seem to get my machine serviced here.  sigh!) Since the top of the line runs in the $10,000-$15,000 range, I guess I am going to have to think a lot about my profit margins and actually earn more than I spend. heheh

In the meantime, I hope to maintain some of the inspiration I have felt as I worked the last few months, being excited about sewing.  That is one of the things that I sincerely missed when it was gone, and was really surprised at how long it took to come back.

Happy New Years! k.

Friday, September 3, 2010

All the Things I am (not)

My friend Ruth posted a lovely message (with a million links) about how blogs can make us feel bad....and how to nip that in the bud.  She challenged us to write a similar type of entry glorying in our less than perfect selves with all our mess and bother.  I don't think anyone reading my blog/FB would get down on their mothering etc, since I am not sure that too many people actually read it, and besides, it is not as if I post about the organic homemade popsicles my perfectly coiffed, fashionable children are eating while using polite language to describe all of their fun extra-curricular activities.  hehehe okay that visual just cracked me up.  THAT is the first thing: Most of what I do is purely for my own entertainment.  And I despise popsicles.

I won't number these because they are all nested.....like the last two.  Besides, that kind of order requires a certain level of parallel structure that I really think I am incapable of managing.

I can't blow my nose.  Seriously.  Well, that isn't really true.  I have developed a system to get my sinuses clear, but the whole use a Kleenex?  Nope.  It makes my ears plug up.....and I always get mucus everywhere.  (Here is a nested one:  My kids say mucus.  We are geeks.  sigh!  At least it makes everyone else laugh. heh!)  I remember when I was little fighting with my mom over blowing my nose, and I suspect my rejection of it is due to the ear thing, but I can't be sure.  So as a corollary, I am also a sniffer.  I also can't sneeze only once.  It has to be like 27 times in a row.  (That really happened once.)  And my last nose related thing: I do NOT like it when people touch my nose.  This was tricky last week when my boy went through a touch noses phase.....

My housekeeper had to sneak in to my office to clean while I was in the States.  She is the greatest lady, but I often wonder what she thinks about me.  I am incapable of keeping my house clean, and what is more, I don't want to do it.  I guess the truth of the matter is: I am capable, I just won't.  Part of the issue is that I like having stuff OUT.  Especially true in my office, but not only there.  I really don't like having to go get my "eating" book.  When I sit down to eat, I want my book on the table.  I KNOW the table is not a great storage place, but if I always want it when I sit down?!?!  Did I mention that I almost always read while I eat?  Even when my children are at the table....sad, I know.  My daughter also reads at the table.

(This is all linked but seemed like the paragraph is getting too long to read easily online! hahaha)
Back to the issue of having things OUT, my husband is always buying storage systems for me.  He is alarmed by the stacks of fabric everywhere in my office.  He thinks that it is because there isn't someplace else for it to be.  There is:  it is on the floor....where I want it. heheh  A Large part of my creative process involves seeing things over a period of time.  Fabrics are often stacked in coordinating groups based on color, while my "storage" is by fiber.  This means that if I put it AWAY I can't use it as a palette to inspire me.  I also never know when the need is going to strike me and I will start work on it.  Having said that, I must admit that I have one palette that has been gathered and waiting since Hawaii...so more than 3 years.

I have no tolerance for pretending to be animals.  I like to believe that I am the kind of person who wants her children to be creative, but this is a creativity I can not abide.  The boy is a dog these days.  argh.  It is especially irritating when he tells me that dogs don't use the bathroom.  I usually point out that they also don't talk and he had better get in the bathroom. 1....2.....3.....4.  Penalty.

In my house we count to 4 when people are on their way to getting in trouble.  It is my favorite number, but it is getting a bit over-used of late.  We also have a penalty rather than a time-out.  It sounds more ominous.  But then I start getting worried that people will think I am going to beat my children when I ask them if they need a penalty.  And I do ask them.....and the boy usually answers yes.

And the last thing for today?  I can not manage to call to make a reservation for childcare.  I am incapable of making a phone call at the appointed half-hour.  sigh!  All the other things on my list are all things I have made my peace with.  They are a part of who I am, but this one drives me nuts.  I am trying to make a change, to exercise.  (because I find I make too many apocalypse jokes about me and exercise so something has to change.)  I signed the boy up.   I even paid already, and I simply can not get my act together at 5 p.m. to call for a reservation.  It doesn't help that the class I want to attend is the only one it fills up for.  I want to think of myself as a person who can make this happen.  I am not sure I can.  sigh!  If you are reading this around 5 p.m.  can you give me a call and tell me to go make a reservation?  please.

So take Ruth's dare and tell us all about the stuff under your bed or the junk in your trunk (hah) or whatever.  Be happy. k.

Thursday, September 2, 2010

"Not a Wallflower"

When I started with Cursed Quilt we did a little block.  The fancy version of this block is the pocket on the bag featured here.  I decided to use the same block simplified as an example of how different a block can look based on fabric placement.  Of course what do you do with 2 mostly coordinating blocks?  Why make a quilt of course.

I decided (almost as soon as the blocks were finished) that I needed to make a quilt for S and that this palette would be a good transitional one for my girl....you know, not too little girly but still fun and lively for my eventual teen.  The black sashing goes a long way towards that effect I think.

The floral fabric was purchased on a Dongdaemun trip with Darsha.  We saw it and absolutely had to buy some.  I believe the baby blanket Darsha made (with the purple) belongs to Carolyn, sometime poster on the Cursed Quilt Blog. :)  I made Darsha give me all of what she had left over...and you will see why at the end of this post.

So this was the plan:  I would make pairs of blocks, one purple, one green.  Each block I chose has a little square in the center on point.  You can interpret this all sorts of ways....each one has a diamond in it's heart...I like the idea of imprinting my someday teenage girl with the idea (at least subconsciously) of keeping a little "square" in your center. heheh  You also don't have to be just exactly like your friends to go together. etc.  You get the idea.  You can see some of the pairs in the picture.  Most of these blocks come from the fabulous site "Quilter's Cache" which features the work of Marcia Hohn and is one of the best block collections I have ever seen!  I modified most of them to fit my needs, but she deserves the credit for all the inspiration.

The main central panel is my first ever applique' piece.  I was very pleased with myself, even if all those curves and inward points was perhaps not the BEST idea I have ever had for a first project.  I even gave the flowers on the panel a bit of a trapunto effect (a thin layer of batting between the applique' and the panel to puff it up a bit.....a tiny bit.  I wasn't THAT ambitious!)  That turned out to be quite hard to quilt through, although the effect is kind of interesting.  If you look closely at the pic of grandma you can kind of see the puff on the green one...)

Once I had it constructed (in March or April) it sat around.  I am too chicken to try to machine a piece this large but have absolutely no place to put a quilt on (frames) in this house (that wouldn't involve crawling under it to get in and out of the house!)  Luckily I planned to spend a good part of the summer at "Grandma's House."  Grandma being my dear mother Jean Johansen Hunt.  She is an experienced quilter and works very quickly so I knew we could get it done during the trip.  Perhaps it wasn't what SHE was hoping to do during our visit but..... hehehe.  My own "Grandma Hunt" (Phyllis P. Delange Hunt) was an insanely fast quilter.  I used to be amazed at how much she could do in a day when she lived in our "back yard" one year.


The hand quilting plan was simple for the blocks: stitch in the ditch.  My mom quilted ALL the blocks themselves.....while she did that I did about 7 inches of the sashing!  sigh! 

While the quilt was on I realized that the "name" of this quilt was "Not a Wallflower."  And as such, the sashing was going to have to be quilted in flowers.  I decided to try to make them individuals so I drew them all by "hand."  That said, there are a few repeats.  My tools for the drafting of these flowers included every size of plate and bowl my mom's cupboards had to offer, an advil bottle, the bottom of the thread spool and my own thimble.  The first few that I drew aren't much to look at....I even contemplated picking the quilting out on one that I really don't like anymore.  After a while I got the hang of them though and they are very interesting.  Of course, as you may expect, the more "interesting" a hand quilting is, the trickier it is.  The effect was more than I could have hoped for though, so it was all worth it....wasn't it Mom?!?! hehehe

Many of the flower designs are supposed to echo the styles of the floral fabric.  There are also a few hearts sprinkled throughout to echo the other black and white print used, and the applique'd hearts on the corner blocks (which are sadly not visible in any pics.)  Most of the flowers are too large for the space so their edges are all tucked underneath as you can see in the picture.  I teally like that effect.  After we started quilting, I realized I should have planned the center so that the sashing and central panel could be continuous in the hand quilting....but the planning of THAT would probably been the demise of the design and it would never have been quilted. :)

I still haven't figured out how to tag this one.  I wanted to do a long embroidery on the binding but my machine is in desperate need of servicing so I had to give it up or risk more swearing than perhaps is good for my soul.  This is what I WANT on the tag:

"Not a Wallflower"
Spring and Summer 2010
for Senneth Anne Hartvigsen
Designed by Kimberly Hunt Hartvigsen (her mother)
Quilted by Jean Johansen Hunt (her grandmother)

You can see that is a mouthful....pageful? most of the binding?  I think I will probably make some more printer fabric and just print a tag so it will be small and attach it on the back.

You can see in the top pic that I made S some matching pillowcases.  This last pic was taken after that project was completed.  This represents ALL the floral fabric there is left.  ALL.  I had to piece together some of the triangles to get the pillowcase border I wanted!  The other pillowcase  has the backing fabric and black on the edge.  (That is the green and turquoise floral you can see bits of.  This was purchased at the quilt shop in Lyons, CO where mom likes to shop sometimes.  Not the cheapest place around, but when you NEED something wonderful they always seem to have it.  We had several options picked out and this is the one S liked best.)

SO there, I actually finished a thing.  Hah!  As you can see, it has even made it on the bed, although it is still too hot to sleep with it I think.  The binding was ALL attached during the days off from school for the typhoon "Kompasu."  How is THAT for a story?  Now go sew something. k.

Thursday, August 26, 2010

Building With What We Have

As you know I am actually rather enamored of the idea of the Quilts of Valor Foundation.  This is partially because I have been feeling the need to do more "good works" and quilting is a way to do that and still be doing what I want!  (Perfection is still a long way off, I know...)  I also feel more of a connection to the soldiers in question and have thought a great deal about the healing that all of the deployed soldiers need, not just the physically wounded ones.  N. has many patients who need all the support they can get as they struggle to put their lives back together.

So this is my first design and it is almost ready for presentation! 

The design is a Split Log Cabin, that is, a Long Cabin Block that is cut in half and joined to a different block.  In order to do this and have them be square the center is actually a rectangle....the square plus seam allowances through the center.  I saw a quilt done like this online and really liked the look of it.....especially since I had a jelly roll to do it with.

The quilt is actually a bit more than one jelly roll in size....the lighter colors come from a different roll.  It was so easy to put the blocks together with the pre-cut strips. 

The hardest part to put together was the border on the side of course, but I really wanted to give it a sense of being a work table....and that the process of rebuilding is ongoing.  It has all sorts of crazy bias and making things look "random" is actually very tricky.

N. recommended alternating the direction of the blocks, and I really like the way that turned out.  I even tried to set each split square with one going each way.  Of course, many of the squares aren't actually split....they were made as a half as I got down to smaller and smaller pieces that would go together.  The outer row is actually just slightly longer than the 42 inch strip on a full split block.  If you look close, some of them have slightly different colors on the outside of one corner.  Others have matching centers but not matching outsides.  It all worked out though.

The back is also black and has little stars on it.

After a day of trying to figure out why the picture of the quilting (by the lovely Debbie Younkin of Fort Collins near mom's house) I have given up.  Some day I may have the presence of mind to figure out why everything else works but that pic won't.....sigh!  You are just going to have to trust me that it looks GREAT!  It is a whirlpool style all-over design and it works really well.

And so we don't get too bogged down in things I OUGHT to be doing, here is the last pic of the "Presentation Case" which is simply a coordinating Pillowcase.

All in all, this has been a great experience that I plan to continue.

Now I need to go bind "Not a Wallflower" and if I am really ambitious I will post pics of the pillowcases I made for the 1,000,000 Pillowcase challenge (and you can find info about that HERE!)

In the meantime, make something that makes you smile even if it is a mess (or some order, if that is more your style.....mine is mess in case you were wondering. heh) k.

Friday, August 13, 2010

Building a Temple

As part of Darsha's Summer Challenge for Cursed Quilt I decided to make a block of the Seoul Korea Temple.  It is a fairly odd shaped building, so I was a little worried that it wouldn't convey the sense of the building but I really think it does.  Not bad for my first representational block design.

If you don't know what this is supposed to look like click here There are lots of little details that could be added in, but as maybe you can tell, my favorite part is the cool wavy bushes in front.  (After my time teaching here in Korea, if you had asked me to describe the temple, that is perhaps the only detail of the exterior that I could have given....well that and the super steep street you have to walk up to get there.
The structure of the Temple is done with "foundation piecing" and that was an adventure to figure out.  The great breakthrough for me (although why it took me so long to imagine it that way I haven't any idea) was to divide it into columns around each pillar.  The tiny pieces that make up the doorway were pretty tricky too, but despite my lack of experience, applique' with the machine is really pretty straight forward.  I was emboldened to use the tiny tiny pieces after watching my mom make some dainty little bugs for Miss Emily's flower garden quilt....The wavy bushes are also applique' and are a little hard to see in the pic.  Sorry.

I worked on an almost literal "million things" this summer and have tried to take pics as I went, but that means I have a terrible backlog of  reporting.  I intend to put them all up, but we know all about good intentions and where they lead!  The projects include tie-dyeing 39 shirts, hand quilting a whole lot (Grandma Hunt did MOST) on "Not a Wallflower" for Senn, a whole cloth butterfly hanging for Mom's Birthday etc.  I also made pillow cases to go with Wallflower, went windsurfing with no wind, prepared my first "Quilt of Valor" submission, and contemplated but still didn't bind the tree.  Poor neglected tree.

Happy sewing, reading, cooking or whatever else it is you are doing.  Be happy. k.

Tuesday, June 15, 2010

Uproar in my Head

Not so much "work" or "play" lately.  Just one of those internal times I guess.  I have several projects that call out for finishing, a whole lot of mess that calls out for organizing and a whole lot of sitting and just contemplating that seems to be the only thing happening. :)

Yesterday Isaac and I ventured out to the Sejongno Immigration Office.  To my dismay last week I discovered that many things were set to expire while we are home on our family trip.  The most important of which was a little stamp in our passports.  I (of course) just missed the convenient "on post" way to get that taken care of so I had to go down town. 

After all my online research, trying to figure out just what this was going to involve I had worked myself in to quite a state....so I geared up for spending the day waiting and waiting.  I even made plans for how I was going to get Senn home form school if 10-2 was not enough time to get the job done!

We were done in less than an hour.

That made me happy.

So now I really need to get packing for the trip, need to wrap up some of those projects and do about a million loads of laundry (complicated by the fact that it is super humid and stuff will never dry.  I wonder how bad it would be to pack my laundry and wash it at mom's. hehehehe

There has been a lot of mental drama too, but as that eases off, I find that I don't even want to explain.  I need to just let it wash over me. :) k.

Sunday, May 16, 2010

My "New" Toy or Anthropologie Catalog here I come!

Recently, I asked for a new toy.  It seemed like a good idea at the time.  Like all interesting ideas it was quite expensive and hard to come by.  A good deal of arranging had to take place but my dear husband always seems to come through.  Now all this talk of gifts, you may think this was a birthday gift...but alas, this treasure has been sitting on my desk unused since Christmas.
Perhaps it doesn't look like much to you but this, Dear Reader, is a ruffler foot and not just any ruffler. This is a ruffler for my serger.

I have had my serger for a good many years.  (I bought it in DC....yeah, a good many!) I don't really end up using it all that much.  The edge is too wide, too bulky, too too too....for boxpleat doll work.  (In general...I have been trying to use it more lately to good effect as it really is quite a good machine and more versatile than I give it credit for. :)

So while this little "thing" isn't going to change the world, it certainly has facilitated some fun.

Here is what I spent the day Friday making:

The fabric is a very soft shirting weight..... chambray maybe?  It is 100% cotton, a pleasing color and I got an extra 1/2 a yard for free because there was a spot I thought would wash out.  (It did!)

With the ruffler foot on the serger this went from strips of fabric to skirt in a remarkably short time.  You see, this foot gathers what it finds on the bottom and leaves the top smooth....so really all I did was hold the fabric lightly and sew straight lines.

Well okay, it was a little trickier than that.  In fact, I think it will probably benefit from some practice.  It is a little tricky to hold the fabric in place without putting any real tension on it.  If you put any traction on the bottom layer it doesn't feed at a regular rate and you end up with straight patches instead of even ruffles.  In some sections the serged edge is not fully over the edge of both fabrics...but like I said, I think both of those problems are easily addressed now that I know what to watch for in my technique.
The one tricky thing I still am not quite sure how to solve is the problem of estimating the tiers.  When making a skirt like this the traditional way...with lots of pins and gathering stitches...you just take your two very differently shaped pieces and pin the centers, divide and pin again and again until you can pull the gathering threads and have nice even gathers that make it all the way around.  When I worked on this skirt I ended up having to add another piece to the bottom ruffle because, as much as I had, it was simply not enough to get to the end.  (That will be partially solved by decreasing the differential feed....ie the ratio of bottom gathering for every smooth stitch on top.)  I am sure there is a way to do this with math + patience but I haven't quite figured it out yet.

Once the ruffled tiers were put together... (Oh, I used the high tech measuring system of holding the first tier around my hips, adding a bit and there you go!) I plain serged the top and bottom edge.  The elastic is a half inch wide and reminds me of the kind of elastic stretchy belts were made of in the 80s!  It is fairly firm and will stand up to a lot of stretch while maintaining its  shape.  The top of the skirt is just rolled over the elastic (edge of elastic and serged edge line up.)  I put 4 rows of stitching over the top (sewing while it was stretched of course) and I will never have to worry about the irritating twist in the elastic that haunts all my casings. hehehehe  You will note that this skirt has a boxpleat tag in it.  This is the first full sized piece of clothing to bear my label.  Not that I haven't made anything for myself before....just that I always thought of boxpleat as my "Doll Business" but really it is just me and if I made it, it should have my tag. 

I chose a "fancy" stitch for the top stitching and hem.  I wanted to do it for the waist also, but I chickened out because the decorative stitches move so much back and forth I figured it would be too hard to maintain the tension in the elastic without pulling the stitch our of shape.  The fancy stitch took FOREVER!  I had forgotten that one of the reasons it is nice to do doll sewing is that you never have to do the same thing for too long.  I like the way it turned out...and that is what made me think of the catalogs of my college days.  The thread is a variegated rayon in blue gray and white, so the color progresses as you follow the stitching.

Once the skirt was finished I threw it in the washing machine.  I was perhaps a little zealous, not knowing what to expect from my little toy and the skirt was BIG....like Square Dance big.  After a wash, I twisted the skirt and then left it to dry.  The resulting shape appears neither too full, nor will ever have to be ironed...in fact, it really shouldn't be. hehehe (You know you like the sound of that.)

My only real disappointment with it is the hem.  After the wash, there is a bit of cupping....I think because the rayon thread may have shrunk.  Not sure how I would get around that in the future.  It isn't really a visual problem on this skirt with all the crinkles, but something to wonder about.  Anyone out there have any ideas?  I probably needed to have some stabilizer in the hem....sigh!

So go make something.  It will make you happy (even if you hide it in the back of your closet and no one else ever sees it. ;) k.

Wednesday, May 12, 2010

Mastery

It is an interesting thing to watch children pursue mastery...but I should say that it is also fun to watch (or be) an adult in the pursuit of it as well.
For my birthday I bought myself some quilt books...all filled with spiky things. Quilt Mavens and Mariner's Compass.

So this is what I have been playing at the last day or so. The fabrics are from my friend's "Quilts of Valor" challenge for Cursed Quilt (which really is cursed by the way....I was supposed to go fabric shopping with a member and my son announced that he was going to be sick. Hasn't yet, but I am not going ANYWHERE in the car. ;)

 In order to use this book you have to either know how to do foundation piecing (paper piecing) or be a bold adventurer.  Either way she has some great designs in here and...even better...some good instructions on how to make your own!  You can see my sketch here with the book.  Not super complex or even as spiky as I am inclined to be, but it is my first effort.
As this was for the challenge I actually drafted this twice.... the foundation in the picture is only 8 1/2 inches.  Since the blocks are supposed to be 12 1/2 I realized that I had better just draw it again and not be lazy. hehehe

The trickiest part of this whole process is figuring out how to divide the design and decide which section has to be done first.  I could see there were several ways to do it, but everyone was going to require one of my shapes to be split.  Here you can see it as it is so far...

I like the look of the circle in the center of compass designs but I am not so sure I really want to do any applique' hehehe.  (I also am not sure I know what color it should be when I do it...) The fabrics for the Challenge are the two dark prints.

As for my Mavens Book...this block makes me feel cool.  Yes I know I am a terrible quilt geek...and that it may not go with all the rest of my blocks that I designed for the challenge quilt.  But I LIKE it.  (Note: this is a pattern from the CD that comes with the book....and it was 9 inches, thus the borders...but I even like those.  The inner fading border is from a  fabric I got for my "How I Spent My Summer Vacation" which is still just a top in my work box.
Yeah, I know.  Quilt Geek.  You can't have any idea how I agonized over getting the lines of little dots in the middle of that spike.  Surprisingly hard.  But worth it I think. heh.

This style of block is sometimes called a "New York City Beauty" and other variations on the theme.  That appears to mean that it is a spiky 1/4 circular pattern.  That is actually how I found the books I bought....searching for that type of Art Deco block with the arcs in it.  The books I ended up with are better than any of the ones purporting to be about actual "New York City Beauty" blocks.

Do something that makes you happy today.  It doesn't even have to be spiky! k.

Sunday, May 9, 2010

And Another Kind of Work

As you may be aware, the boy loves trains in all their many forms.  For his birthday he got trains, of course.....and so nearly every day I have a new kind of work.

The picture on the top is today's creation. I like the spiral levels but we simply don't have enough corners. hehehe (You can see the wimp out raw edges in the center of the pic.)

The second picture is actually from several weeks ago when I meant to write this entry. I was particularly pleased with this one as there are no raw edges to be found and I believe all track can be traversed in a single loop.

For the record these are GeoTrax and the best price I have found is actually from the FisherPrice website!

The trouble with making fun train tracks is that i doesn't get that I don't actually want to PLAY trains. He is only moderately interested in the building process and I am not so interested in making things go around and around and around...

In addition to the fact that he will regularly state that he just doesn't like this one...I have somewhat mixed feelings about this new work of mine. (He also regularly tells everyone that his dad bought him all these trains, despite the fact that all but the very first small set have been acquired by me. hehehe N is lucky he has such a great assistant to make sure gifts get ordered, make travel arrangements and do the laundry. hah!) In any case the work continues....

Wednesday, April 28, 2010

A Cleaning Day?

As you can probably see, the office is even worse than usual.  The reason?  Well I actually did some things. hehehe

Yesterday I sent out several boxes.  I sent 13 yards of sequin fabric to my dear friend Pam Seeman of Paint Box (She designs doll clothing like I do.)  We met at my first Doll Convention because some customers just can't keep Paint Box and Boxpleat separate. hehehe  She graciously offered to take some of my work with her when she goes to the Final "Official" Gene Convention in June, so I spent the first part of the week sorting, pricing and packing the odds and ends that I had.  I told her I had a few pieces but was surprised to find that I had more than 100.  Not all of it is "never before seen" but there is quite a lot.  The best part about this set up is that I don't have to take pictures!  I will say this: I sent a Large Priority Flat Rate box and it was entirely filled to the brim.  I hope some of my customers will find some things they like and will remember me fondly.  Gene was my first convention.

In the meantime, you can see the state this has left my office in.  I also sent away the large box for hte Humanitarian Aid Center....16 pounds of wall hangings and new clothing for the Orphanage Modules they make.  I figured with the big earthquake disasters we have been having lately, the stocks are probably being depleted.

I am feeling a drive to do more, to use my hands to make and build....but first I need to get organized in my own head, and thus I need to organize my own space.  Here's to a clean office and an orderly mind.  Happy day to you. k.

Thursday, April 22, 2010

Always a Quandry...

Ooops, in the throes of my Anti-picture post I forgot to do my office pic.  Maybe I had better just give that up as an affectation.  What do you think?

This is what I have to present for today....and my quandry.  (Sometime I will get back up to speed with all the other adventures I am having, but it is good to start small. :)
This is a little piece I put together with one of my Brand-Spanking New Accuquilt GO!  (I think the exclamation mark is part of the trademark. heheh)  It is a pretty snappy little thing and works well for what it is.  What is that you may ask?  Well it is a die cut system designed for fabric.  Accuquilt Website  You buy a cutter (called a die) for each specific shape you need.  I have the small version (GO!  Be sure to note the exclamation mark.) which will precision cut up to 6 layers at a time.  (The Studio version is a little heavier duty at 10 layers.)

Now those of you who know me well may be perplexed.  This is a great product for people who like to do the same thing over and over again....which as you know I do not. 

I still think that it will be a useful product in my office, but I am going to have to work at it a bit.

Cutting the Apple Cores was actually fun....fun for Senneth.  As the dies are foam with the blades buried inside they are safe to handle; so I prepared the fabric pieces and had S. crank the handle that forces the die between the rollers.  She reported that it was great fun and was disappointed when I announced that we were done for now.  What you see above are some of the pieces we cut.  The curved edges have the notches in the die so the centers of those curves are already marked.  I still had to snip the concave edges when putting them together but the results were fairly easy to achieve.  I didn't take a close up but the corners set in beautifully.

My difficulty is this:  Now that I have this cute little piece, do I wrap it up quick as a wall hanging and put it in the box going to Humanitarian Services (I even have left over red bias tape to bind it with!) or do I find some blue and do the whole primary color thing in an actual quilt.  I have more yellow but not more red....well except for the bias tape.  (Wow that yellow is hard to read.  I see why good web designers don't do colors very often. hehehe)

What do you think?  In the meantime I think I will go back to working on the Circles piece.....

Go Check out the Cursed Quilt Blog.  I posted the pics of the Wall Hangings we have ready to go.  Be sure to comment on the ones you like best.  There are a few more that didn't quite get finished, so there may be more pics later. :)  Have a happy day. k.

Wednesday, April 21, 2010

Okay, so I think I am avoiding my own blog.  How sad is that?!?!

Part of the reason I had to take a break from doll sewing is that I despise the taking pictures thing.  I am not that good at it, it is time consuming and not as much fun as ALL the other aspects of my work....which means I let it pile up until there is a mountain of it which is simply just too tall to climb.

So here we are again, only it is the quilting I need to do pics of.... :(  time for doll sewing again? heheh  A dear friend has offered to take some of my work to the last Gene Convention in June so I am feeling a bit tempted to make a few spectacular bits just to have some income without all the PICTURES!?!? 

Things I should be posting about over the last month include:  The Hexagon Placemats, the Butterfly Garden experiment, my Strip Hexes and Modern Art, and let's not forget the Foundation Stripped Asian experiment....there is also the Unnamed Circle project on the floor (needs borders before I can inset the rest of the circles.)  Oh and there is a new fabric palette here on one of my bins crying out to be something....but only after the Micheal Miller "Lagoon" gets to be something (I like those so well I am feeling a little chicken to cut in to it! hehehe)  AND I have yet to even try out my Accuquilt GO! cutter (I plan on doing THAT today.) And I suppose on a final note, I just found out that the Yongsan Quilters Group has a Statler Stitcher?!?!?  $35,000 of longarm computer amazingness that is available for use.  Of course, I can't find anyone to tell me about it (or how to join if you hae to be a member...NEED to work on that.)

So there!  No pictures, but not short on Work or Play. k.

Monday, March 29, 2010

My Hex Tutorial

Here it is. (click this...it goes to the Cursed Quilt Blog)  This does not include their final status as placemats, but gives a step by step on how to sew those tricky Hexagons together with your machine.  (Sorry for no Office Picture....I know you are all anxiously wondering whether anything will ever get put away... :)

k.

Thursday, March 25, 2010

This morning I finally finished the "Prize" for the Cursed Quilt Group Challenge I issued when we first started.

It took me so long not because it is a hard project but because I was slow to find the black tote bag to put it on. heh.  Dongdaemun came to the rescue of course.  What will I do when I move back to the States and can't go to one place to find the makings of (incredibly) ANYTHING I could ever imagine. hehehe

So this is a super easy thing you can do with a loose quilt block or any size....

The Basic Instructions are in Courier and the optional details are in my regular font.  If you just want the easiest way, read only the Courier....but even the optional details aren't hard, just more time consuming.  Be a bold adventurer. :)

First make sure your block is pressed out nicely.  It will be easier if everything lays flat and behaves itself.  Choose a fabric for the back and cut to the exact size your block is now.  For mine I choose the bright red Chinese print, as that was the color I wanted to highlight out of the block.

If you have some experience or are a bold adventurer, add the piping now.  If that freaks you out, skip to the next Courier section.....Okay, so only the bold ones are with us still?  Great, custom piping is actually super easy.  It does require a few additional steps but will strengthen the edge of the pocket and impress people even more when you tell them you made it. hehehe  Cut a strip of your fabric: it needs to be 1+ inches wide and at least as long as the block you are doing the edge on.  

Are you ready for the secret?  All piping is just a piece of cord in a fold of fabric.  Traditionally, the piece of fabric is cut on the bias, but for an easy straight application like this, I just used a straight cut.  The cord?  I just used some thick yarn I have.  When I have made piping for application to some of my doll work I have just used crochet thread.  So all you do is lay your cord down the center of your fabric strip and fold it over.  I stitch it using my zipper foot (which is the skinny one with the needle spaces on the side rather than the center...be sure to remember to move the needle over to the side.)  I guess I need a picture here, eh?  I will work on it.  Now just sew right along the edge of the cord through both layers of fabric.

Still Piping....keep skipping if you aren't doing this part. :)  Now trim the fabric raw edge on your piping to 1/4 inch (from stitching to raw edge, don't count the cord) or whatever your seam allowane is going to be.  Pin it with the raw edge right along what you choose as the TOP edge of your pocket and stitch right over your previous stitching.  When that is finished, fold the little corners of the piping back a little to get them tucked in and away form the seam allowance for the next step.

And finished with piping.  If you want to make a plain elastic button loop, you need to put that in now.  That is just a loop of elastic about the right size to go over the button you want to use.  Be sure to leave some good long edges that extend over your seam allowance so the elastic doesn't just pull out when you use it.   Pin it in place with the loop laying over the top of your pocket and the edges pointing up. (That way, when you turn things right side out the edges are inside and the look outside.)  You should probably measure if there isn't an obvious landmark for the center of your block....unless you want it off center - which is fine as long as you mean it. hehehe.

Instructions for the fancier loop I did, are at the bottom.

Now, with right sides together, sew straight along your seam allowance for all the sides, leaving a gap that is a little wider than your hand in the bottom.  I usually backstitch just a few at the edges of my opening to keep it from coming apart as I manhandle it right side out.  If you cut the corners at an angle just outside where your stitching crosses, it is easier to get the corners to be pretty.  Don't cut too close though or it will come apart and you can't blame me for your swearing, okay? :)

When you have it turned right side out, press it.  Make sure you fold in the edges of your opening when you press and then pin it shut.  You can hand stitch it closed at the point or just be careful with the pins still in.

Before you put it on the bag, top stitch along the top of the pocket to give it some strength and to help it keep a crisp edge.  This goes for you guys with piping too.   Now is also the time to put some machine quilting on to your block.  Like the top stitching, it will help strengthen your pocket and keep it from looking saggy.  On mine I went around the "squares."  You don't need to do all of the block, but you want it to hold together well.  I didn't even put the feed dogs down....just sewed along the lines.

Once you are finished with the top and machine quilting, pin (or baste)your pocket in place.  Stitch right along the edge (making sure to backstitch at the top opening edges as they will be facing the greatest strain.)  If you leave your needle down when you get to the corner you can carefully turn your bag and stitch along the next side without ending.  The hardest part about this project is keeping the rest of the bag out of the way while you stitch it on. :)

And guess what?  You can be done if you want to be....

If you want to try the fancy loop I did, cut yourself a long (12-18? inch) bias strip that is 1 inch wide.  (I looked for a bias tutorial online but they are all a LOT more than we need.)  Mine has a seam in it so I didn't have to cut it out of the center of my fabric.....Mom used to hate when I did that!  Once you have your strip, fold it in half and sew (leave a long tail of thread, don't trim it yet!)  If I want my tube to be 3/8 inch, I start stitching slightly wider than that and move to my desired width in the first inch of sewing.  It makes it a little easier to get started when you are turning it inside out.  Sew to the end.

I know there are fancy tools for turning tubes that you can buy but I have never gotten around to actually buying one. hehehe  This is what I do:  The long tail of thread from the top that is a little wider right at first?  That goes through the eye of a really big needle (and I mean big like for needlework on plastic canvas!)  I loop the thread through it several times so it won't slide.  Then I just fish the needle through the loop, pulling very gently to ease the edge down in.  It may take some time and patience, but you can do it.  Don't pull too hard on your needle or the thread will break and you won't be able to get it turned inside out afterall.  (Trust me, I have done that A LOT....but usually when I am trying to make tiny tiny bias cord....like 1/16 inch :)

With your tube in hand, make a loop shape that is pleasing to you.  It can have any number of loops in it, they can be the same or different sizes.  Your ends will need to END in the center so they can be hidden.  Once you have a shape you like, tack it together at all the intersections so it will hold its shape without you.  Once that is done, you can tack it on the top of the pocket, lining things up so they please you.

I will go back and take some pictures of some of these steps as I can see my explanations, although perfectly clear to me, may need some additional support. :)  I guess I had better go get another bag and start again. hehehe  Maybe N will get his Skull Fabric Church Bag after all. hehehe k.